This guide will help you make advanced design adjustments to the Featured Product Widget using custom CSS. Unlike category pages, which are built from a template and require a different customization approach. In this article, you'll learn how to use this guide to customize the look of the FPW, overriding default styles to create a fully tailored appearance that fits your brand.
Disclaimer:
Any modifications made using the custom CSS tab in Elementor are done at your own risk. We are not responsible for any display or functionality issues that may result from these changes. DO NOT delete or add other lines of CSS beyond what is featured in this article if you are unfamiliar with CSS.
Step 1: Access the Custom CSS Tab
• Open your page in Elementor by clicking “Edit Page with Elementor.”
• Locate the Featured Product Widget (FPW) on the page.
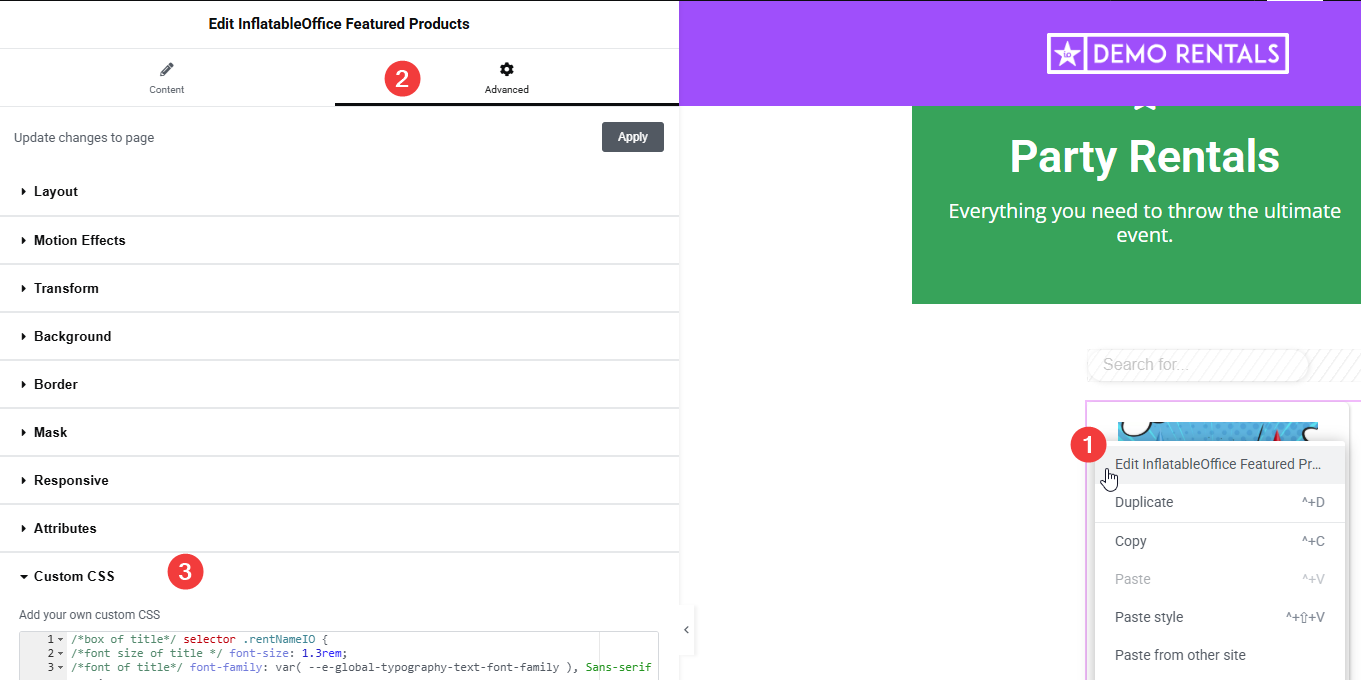
• (1) Either click directly on the FPW element or right-click and choose “Edit...”
• (2) In the Elementor panel, navigate to the Advanced tab.
• (3) Scroll down and click on the “Custom CSS” section to open the custom CSS editor.

💡Tip: Add a Comment Before Making Changes
Before adding any CSS, write a comment at the bottom of the Custom CSS tab to keep track of your edits. Then, add your CSS snippets below the comment.
For example:
/* Start of Custom FPW Edits */
Step 2: Apply Your Custom CSS Using the Provided Table
To streamline your customization process, we’ve provided a table below with several CSS snippets and their use cases.
• Review the table and choose the style(s) you want to apply.
• Copy the corresponding CSS code.
• Paste the code at the bottom of the custom CSS editor in Elementor.
• Use the preview mode to verify that your changes look as expected.
Make sure all CSS value changes are made inside the semicolon ( ; ), and do not remove or modify the curly braces ( { } ), as they are essential for proper styling.
| Use Case | How to Use | CSS Snippet |
|---|---|---|
| Change the size of image used in category/product panel | Change pixel amount of height to adjust the size of the image. Change object-fit to 'cover' if you want the image to be cut off or 'contain' if you want it to be the full image. |
selector .io_mm_outer .cat_img {
    height:200px;
     /*do not edit*/ max-height: unset !important;
     object-fit: cover;
}
|
| Change style (font, size, color) of category/product title | Modify font size, family, and color of the title. To keep only the changes you need, simply delete any unwanted lines. |
selector .rentNameIO {
    font-size: 18px;
    font-family: Arial;
    background-color: blue;
    color: white;
}
|
| Change background of category/product title | Change the color red to your desired color. Do not edit the transparent background color. |
selector .io_item2_listcat { background-color: transparent; }
selector .io_mm_item {
/*edit this background color*/
background-color: red;
}
|
| Move category/product title to top or bottom of category/product panel |
selector .io_item2_listcat {
    flex-direction: column-reverse;
}
| |
| Change margin in category/product panel | Adjust margin and padding of the panel by the pixel amount. |
selector .io_mm_item {
    padding: 10px;
    margin: 20px;
}
|
| Change gap between category/product panels | Change grid gap pixels to control spacing between panels. |
selector .io_mm_outer { grid-gap: 0px; }
|
| Add border to category/product panel | Change the pixel amount to make the line thicker. |
selector .io_mm_item {
    border: solid 2px blue;
}
|
| Remove category name | Hides the category name from the panel completely. |
selector .rentNameIO { display: none !important; }
|
Step 3: Publish Changes and Refresh Cache
• Click the “Update” button in Elementor to publish your changes.
• Perform a browser refresh or a hard refresh (Ctrl+F5 or Command+Shift+R) to clear any cached data, ensuring that the latest styles appear on your live site.
This additional step ensures that any modifications made via the Elementor Custom CSS tab are properly applied and visible to your visitors.
Troubleshooting Common Issues
1. My CSS changes aren’t showing up
Ensure you clicked "Update" in Elementor after adding your CSS.
Try clearing your browser cache or using incognito mode to see if the changes appear.
If you're using a caching plugin, clear the website cache and try again.
2. My changes broke the layout or look incorrect
Double-check your CSS for any missing semicolons ( ; ) or curly braces ( { } ).
If the issue appeared after a specific CSS snippet was added, remove it and test again.
3. How do I remove my changes?
Simply delete the CSS snippet from the Custom CSS tab in Elementor.
Click "Update" and refresh your page to see the original design restored.
4. My text or background colors aren’t changing
Ensure the color values are correctly written (e.g., color: red; or background-color: #FF0000;).
If the color still doesn’t apply, try adding !important; to override other styles, like this:
.rentNameIO { color: red !important; }


