


What is a "Field"?
In the software, every lead sheet is made of fields—the boxes and dropdowns where information lives (like Event Date, Status, Customer Phone, Deposit Amount, or custom questions you created).
What is a "Webhook"?
Think of a webhook as an instant notification or automated text message sent between two computer apps.
- Normally, if software A wants to know what software B is doing, it has to constantly check: "Did anything change yet? How about now?"
- A webhook flips that around. Software B says: "Don't keep asking me. As soon as something happens, I’ll message you immediately."
What does this feature do?
Up until now, sending data to outside apps (like Zapier, Make, Slack, your CRM, or Google Sheets) was typically handled through broader automations or manual syncs.
With Webhooks for Fields, InflatableOffice lets you attach an instant notification directly to any specific lead field:
- You pick a field: e.g., Status, Deposit Paid, or Event Date.
- You pick a rule (trigger): e.g., "When this field changes", "When Status moves up", or "When Deposit is greater than $0".
- You give it a destination: You paste a Webhook URL from Zapier, Make, or your custom server.
- Instant Action: The split second that field is updated on a lead, InflatableOffice sends a notification containing the update and any other lead details or reports you chose to include.
As part of this update, InflatableOffice created a single, unified Fields area in Settings. Under this menu, you can access both Lead Fields and Optional Fields to easily rename fields, show or hide them on lead forms, or mark them as required.
Overview
In InflatableOffice, lead fields capture the essential details of every event—from dates and balances to customer requests and order statuses. With Lead Field Webhooks, you can automatically send real-time data to external tools (such as Zapier, Make, Slack, or custom CRMs) the exact moment a specific field is updated or meets a defined condition.
1. Where to Find Fields & Lead Fields
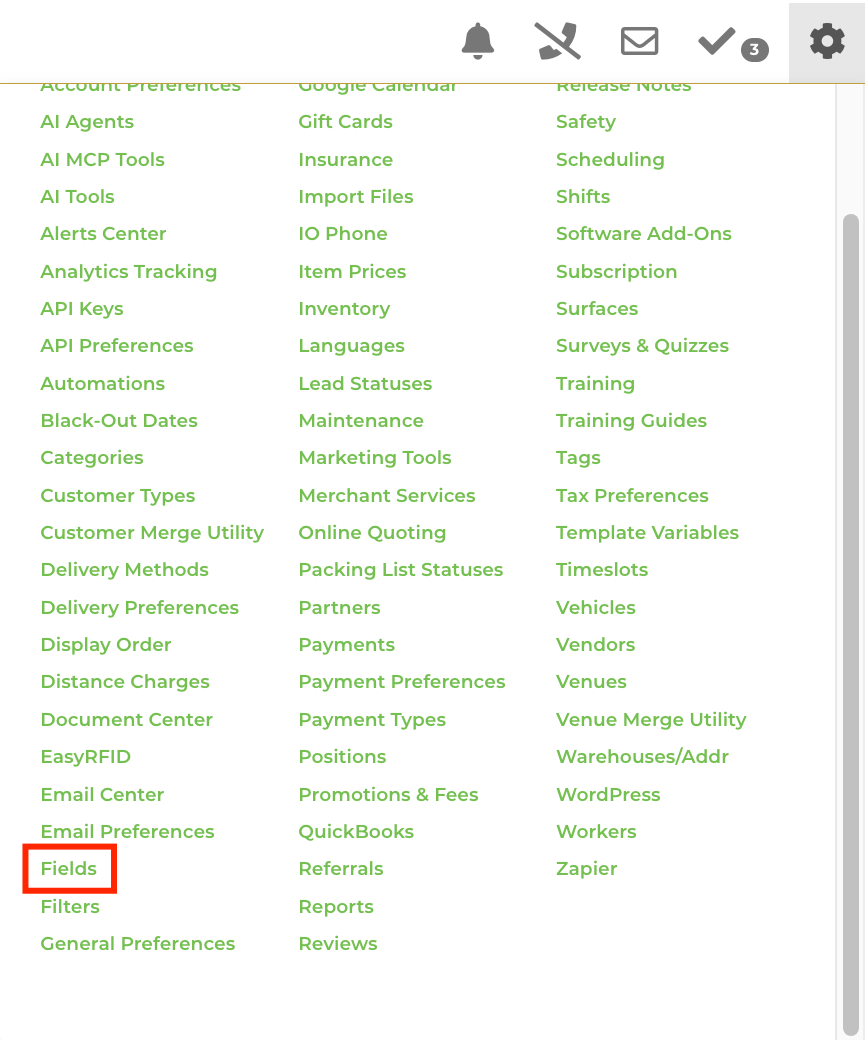
InflatableOffice groups all field controls under a unified Fields menu in your account settings. Under this menu, you can access both Lead Fields and Optional Fields to easily rename fields, show or hide them on lead forms, or mark them as required.
- In your InflatableOffice account, click on the Settings gear icon in the navigation bar.
- Select Fields. (Note: Optional Fields also lives under this same menu)
- Choose Lead Fields from the submenu.
2. Customizing Field Display & Requirements
You can control how individual lead fields appear and behave on your lead forms:
- In the Lead Fields list, click on the field you want to manage (e.g., Status, Event Date, Guest Count, or a custom field).
- Within the field configuration screen, you can adjust:
- Field Name/Label: Change how the field name is displayed across your system.
- Visibility (Show/Hide): Choose whether staff see this field on lead forms.
- Required Status: Mark whether staff or customers must fill out this field before saving a lead.
- Click Save to apply your changes.
3. Creating a Webhook for a Field
You can attach one or multiple webhooks to any lead field.
Step 1: Add a Webhook
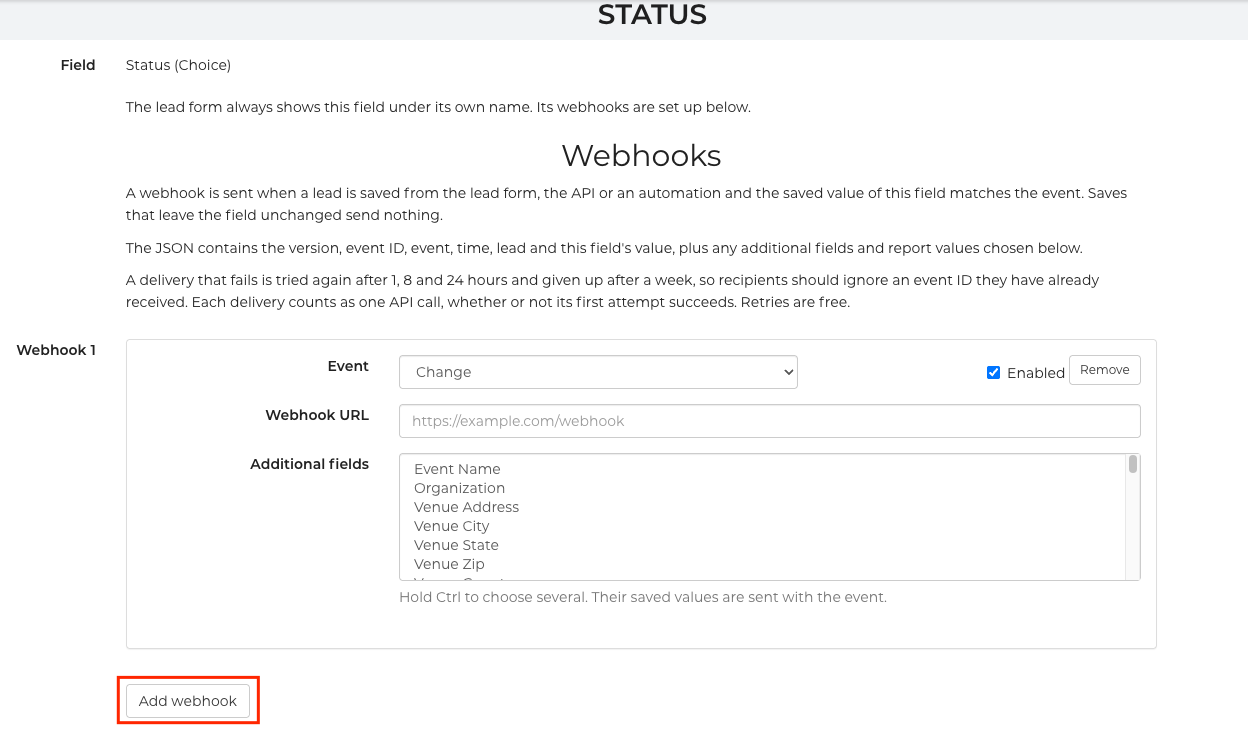
- In the settings panel for the selected field, scroll down to the Webhooks section.
- Click + Add Webhook.
Step 2: Choose the Event (Trigger Condition)
Select the condition that tells InflatableOffice when to send the notification. The available trigger options depend on the field type:
| Event | Sent as | Fires when | Available for |
|---|---|---|---|
| Set | set | The field was empty and now has a value | All fields |
| Unset | unset | The field had a value and is now empty | All fields |
| Change | change | The value is different from before | All fields |
| Equal to | equal | The value changed and now equals your value | All fields |
| Not equal to | not_equal | The value changed and now differs from your value | All fields |
| Greater than | greater | The value changed and is now above your value | Number fields |
| Less than | less | The value changed and is now below your value | Number fields |
| After date | after | The date changed and is now after your date | Date fields |
| Before date | before | The date changed and is now before your date | Date fields |
| Moves up (earlier position) | moves_up | The lead moved to a status that is earlier in your status order | Status |
| Moves down (later position) | moves_down | The lead moved to a status that is later in your status order | Status |
Step 3: Enter the Webhook URL
In the Webhook URL field, enter the destination URL provided by your receiving application (for example, a Zapier "Catch Hook" URL, a Make webhook address, or your custom API endpoint).
- Tip: Destination URLs must begin with https:// or http://
Step 4: Configure the Payload (Data Sent)
Whenever a webhook fires, InflatableOffice sends a structured JSON package that includes standard event metadata:
- Version & Event ID: Tracking identifiers for the specific transmission.
- Trigger: The exact event condition that caused the webhook to fire.
- Timestamp: The date and time the change occurred.
- Lead Identifier: The ID of the lead that was updated.
- Trigger Field Value: The updated value of the field that fired the webhook.
Optional Data You Can Add to the Payload:
- Additional Fields: Choose specific other fields from the lead to include in the same message (e.g., Customer Name, Phone, or Total Balance).
- Attach a Report: Select a saved lead report. When the event fires, InflatableOffice snapshots the report columns for that specific lead and includes those values directly in the payload.
Step 5: Save & Activate
- Ensure the webhook status toggle is set to Active/Enabled.
- Click Save to store your webhook configuration.
4. Delivery Reliability & Usage Tracking
- Queued Retries: If the receiving server is temporarily unreachable or returns an error, InflatableOffice queues the message and automatically retries delivery so data isn't lost during brief outages.
- API Usage: Dispatched webhooks are logged under your account's API logs and count toward your standard account API activity.
Frequently Asked Questions (FAQ's)
Q: Can I create more than one webhook on the same field?
A: Yes. You can set multiple independent webhooks on a single field. For example, on the Status field, you can set one webhook to alert a dispatch channel when the status changes to "Confirmed", and another webhook to notify accounting when the status changes to "Completed".
Q: Does reorganizing my status order in Settings trigger a "Moves Up" webhook?
A: No. Adjusting your company's status list order in settings will not trigger webhooks. Webhooks only fire when a status change is saved on an actual customer lead.