
Setting Up
There are 2 ways to setup overnight pricing:
- By item, which is shown in this article. This way allows you to change the overnight amount per item and make it increase if they have more items. Additionally, you can use more round numbers.
- Globally for all items using fees. This way allows you to set it up easier and it can increase based on the items if you choose to make it a percentage of the total. However, when you make it a percentage, you will not have round numbers. To use this with round numbers, you would be increasing the cost on a per event instead of per item basis.
Filters
Conditional pricing is based on Filters. Settings -> Filters.
To create a filter for an overnight rental, you'll first have to Add a Filter.
- Settings
- Filters
- Add Filter
- Enter Filter Name
- Filter Type is Lead (this is based off of the lead)
- Field Name is Lead Number Of Nights (which is the number of times midnights is crossed)
- Equals
- Value = 1
- Add
Here is an example of what an overnight pricing filter would look like:
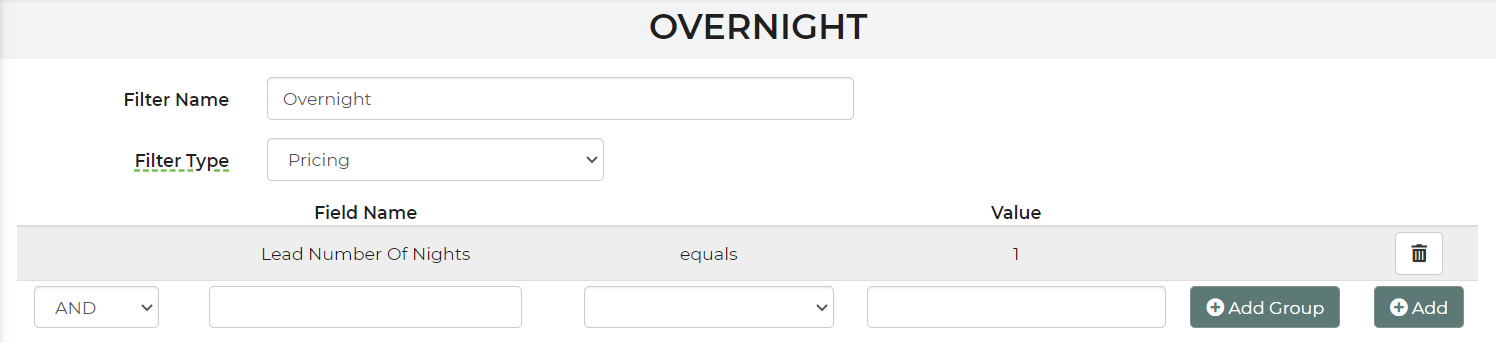
Save and close this filter.
Applying the Filter to your Items
To add the overnight filter, follow these steps:
- Settings
- Inventory
- Select the inventory item in which you would like to add the overnight filter to
- Pricing (If not already automatically pulled up, select the "Show Conditional Pricing" option)
- Once in conditional pricing, select your behavior
(Add to Price: When you're adding the pricing point to the item. Most commonly used when you're applying a flat amount to the initial base price set up.
Override & Stop: When you're bypassing the initial base price and creating a new one with a new pricing structure.) - Apply your Filter (Here is where you add the filter you created in the previous steps)
- The Price Name is if you've already created a Price Name which is created in Item Prices. For more information on pricing, please see this article). This $75 is in addition to the price of the rental item and any fees associated to that item, as this is for an overnight charge. Or you can create a new price pint here, too.
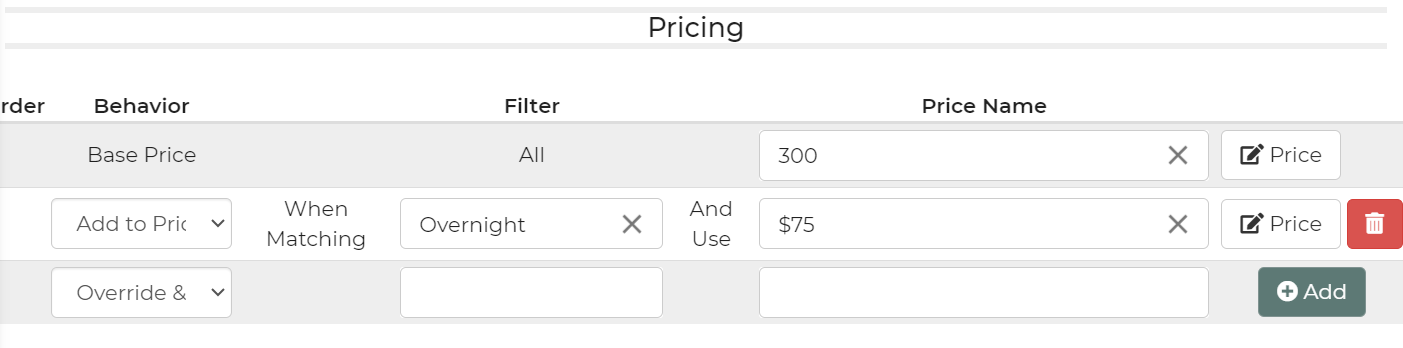
Once this filter has been set to the inventory item, save and close.
You will have to do this for each inventory item you have that is using overnight pricing. Possibly consider the other way to do this that applies to all items.
To verify this filter is working, you can go to Leads/Events, add lead time and date (for overnight rental, price after 24 hours) and the price should auto-calculate the new price.
If the software auto-calculates the price, you may change or ignore this change.
Changing this will cause the overnight filter to go into effect.
If you ignore this change, you will not be charging an overnight filter to the customer.