


Use Card View in the Delivery Planner
Card View presents Delivery Planner operations as readable cards grouped by unassigned work and scheduled vehicles. You can assign vehicles, adjust schedules, review route order, and manage stops without dragging blocks on the full timeline.
Prerequisites
- Access to Logistics > Delivery Planner. Full access is required to modify and save schedules.
- Leads with event times and supported delivery methods.
- Configured vehicles for assignments and route planning.
- For warehouse stops, the selected location must have a warehouse address and coordinates.
Switch Between Card and Timeline Views
- Go to Logistics > Delivery Planner.
- Select the location and date range you want to schedule.
- Open View.
- Select Card or Timeline.
Both views use the same working schedule. Switching views preserves vehicle assignments and unsaved changes. The planner remembers your selected view.
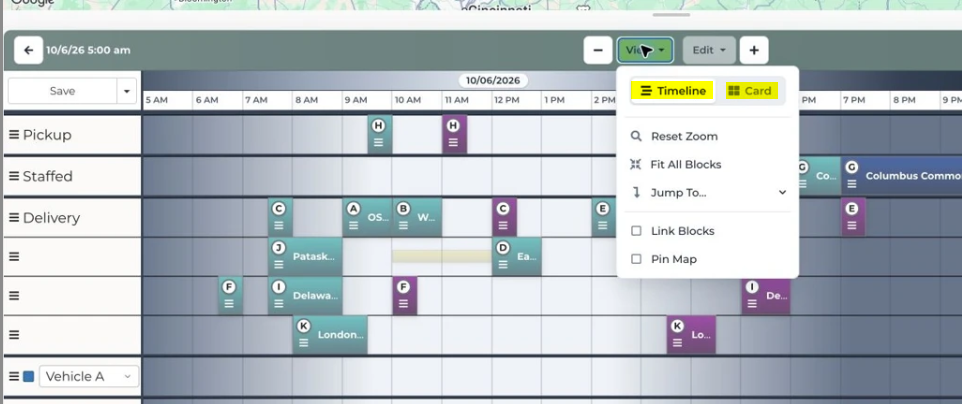
On enabled accounts, Card View opens automatically at screen widths of 640 pixels or less. Timeline and Pin Map options are not shown at those widths.
Review Cards and Groups
Card View displays unassigned work first under Pickup, Staffed, and Delivery. Scheduled vehicle groups appear below them.
- Each group shows its operation count and scheduled time span.
- Collapse groups you are not using. The collapsed state is remembered for the location.
- Vehicles without scheduled operations appear under Unscheduled.
- Use Jump To beside Save to move directly to a visible group.
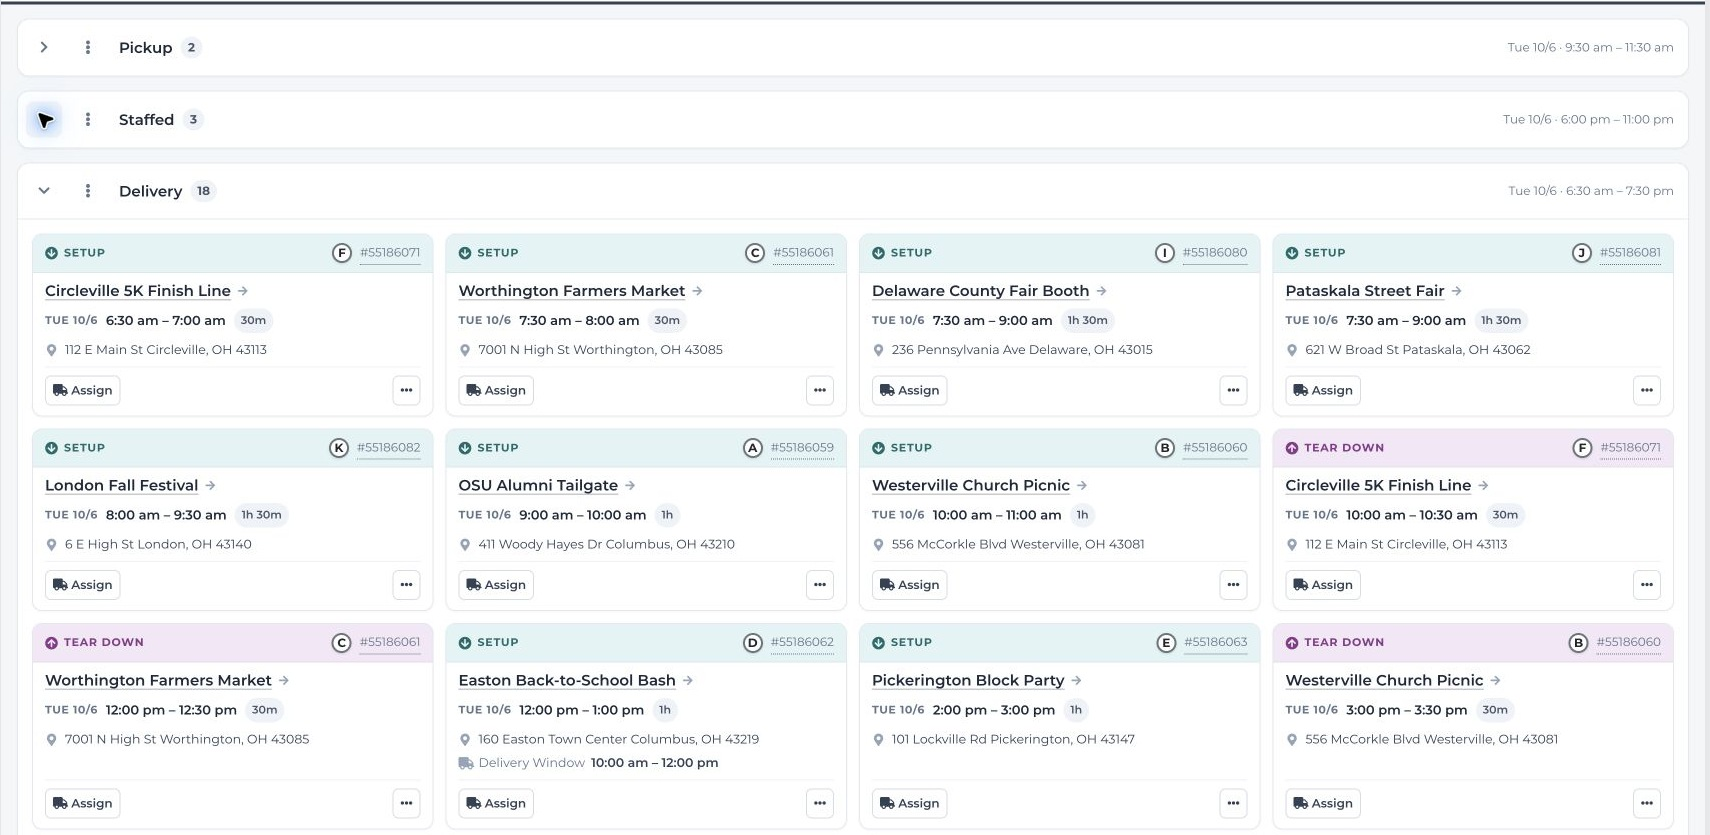
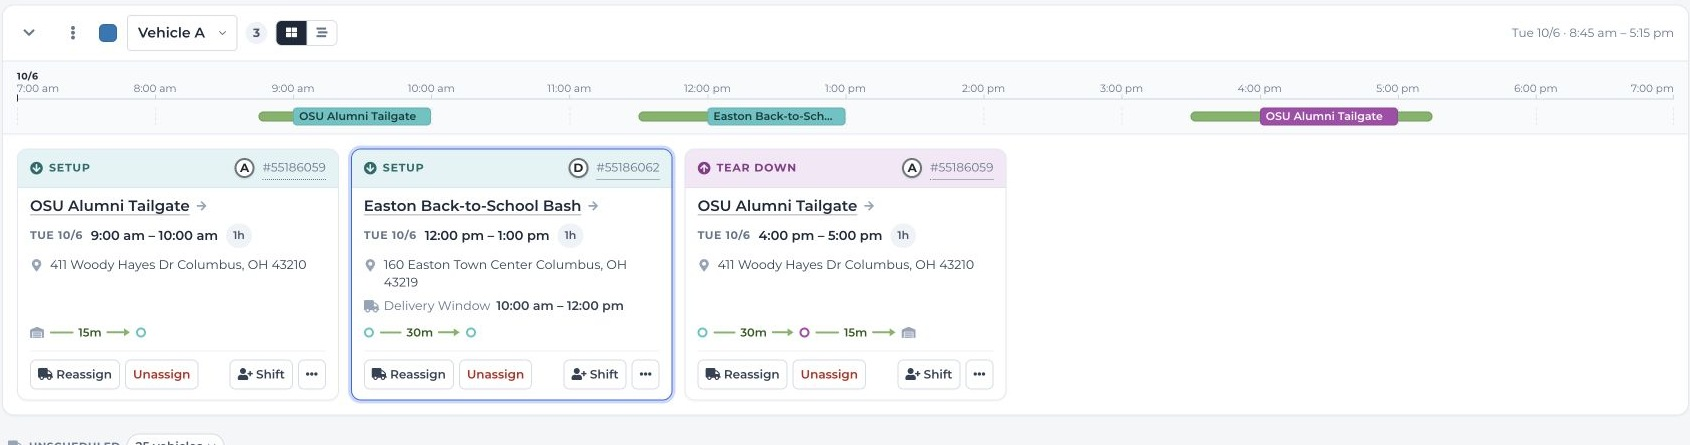
Cards use labels, icons, and colors to distinguish Setup, Event, Tear Down, Shift, Address, and Warehouse operations. Depending on the operation, a card may show:
- Lead number and operation name
- Date, start time, end time, and duration
- Address and map badge
- Delivery or pickup window
- Worker position and notes
- Travel from the previous stop or warehouse
- Lock, link, copy, and warning indicators
Open Card Information
- Click the card title to open Details.
- Click the time line to edit the assignment or schedule.
- Click the lead number to open the lead.
- Click the letter or location badge to reveal the stop on the map.
Assign or Reassign an Operation
- Open the operation’s menu.
- Select Assign for unassigned work or Reassign for scheduled work.
- Select a vehicle. Small vehicle lists appear as buttons; larger lists use a dropdown.
- Set the start time and duration.
- Review the proposed operation, travel, and surrounding scheduled work.
- Select Apply.
- Use the main planner Save button to persist the working schedule.
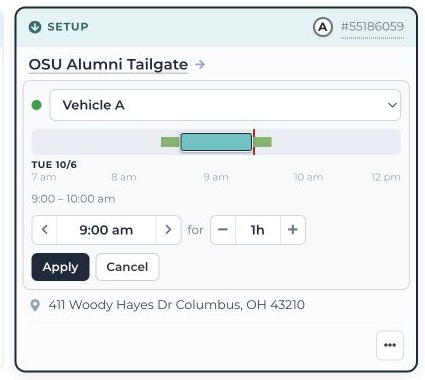
Assign a setup to a vehicle and adjust its schedule before applying.
Assignment and schedule changes are added as one Undo step. Select Cancel to discard the draft.
Adjust the Schedule
- Use the start arrows to move an operation in 15-minute increments.
- Type a time such as 9:20 AM.
- For multi-day ranges, include a day, such as Thu 9:20 AM.
- Use the arrow keys to move 15 minutes.
- Use Shift + Arrow to move one hour.
- Use Page Up or Page Down to change the day.
- Drag the draft schedule chip to place it visually.
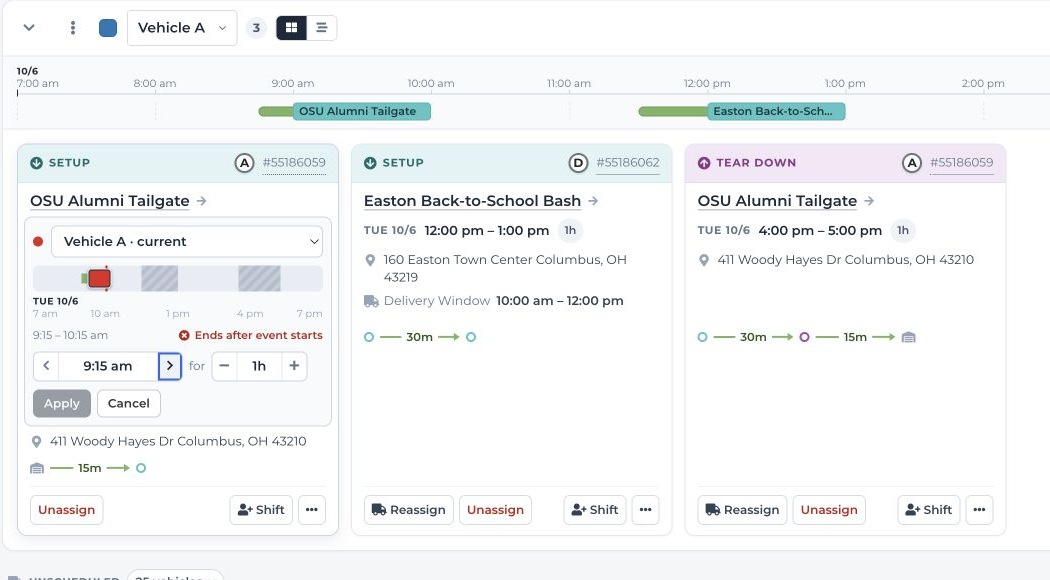
The panel checks other stops, travel time, linked operations, event timing, and locked delivery or pickup windows. Apply is disabled when the proposed schedule creates a confirmed conflict. A setup that ends after the event starts cannot be applied.
Unassign Work
Select Unassign to return eligible work to its original unassigned group. If worker shifts followed the delivery, those shifts may also be removed. Use Undo to restore the assignment and shifts.
Pickup operations remain on the Pickup row rather than moving to a vehicle row.
Schedule Linked Operations
When Link Blocks is enabled, the scheduling panel displays companion operations that move with the selected block, such as Setup, Event, and Tear Down.
- Select a companion pill to edit that operation while keeping the linked group visible.
- Booked event times remain fixed.
- Locked companions cannot be moved.
- Use day chips to move an operation to another planner day at the same clock time.
- Days without enough room are disabled.
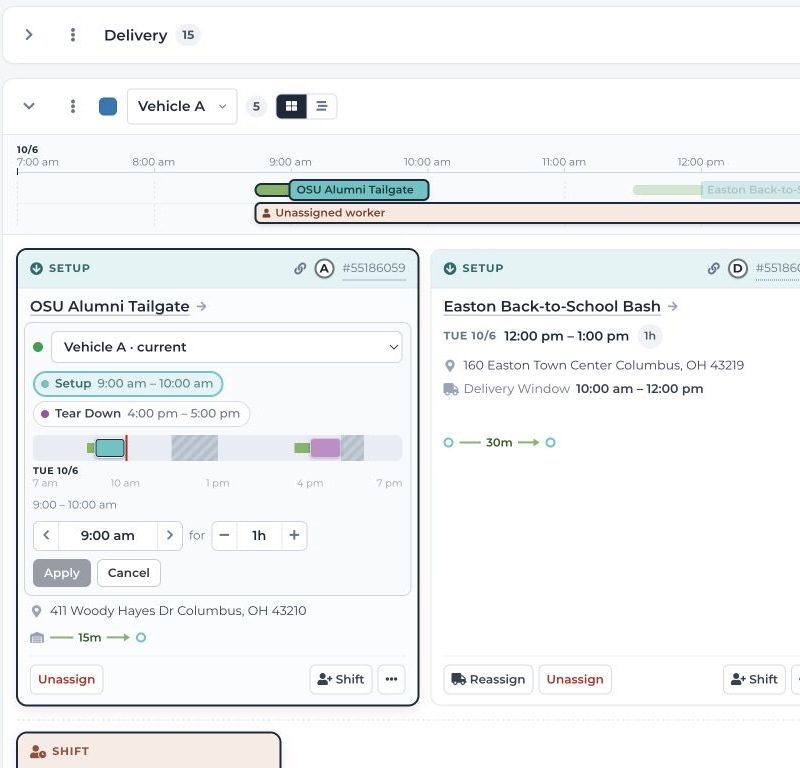
Use the Vehicle Day Strip
Each scheduled vehicle includes a time-proportional day strip above its cards.
- Operations and travel appear on the upper track.
- Worker shifts appear on a separate lower track.
- Drag an operation to adjust its time.
- Resize a shift by dragging its edges.
- Use arrow keys to nudge a focused block.
- Use Shift + Arrow to resize a shift’s end.
- Use day tabs when the vehicle’s work spans multiple planner days.
The preview updates travel, start times, and end times. Red feedback indicates that the proposed placement is blocked. Releasing a valid change commits it as one Undo step.
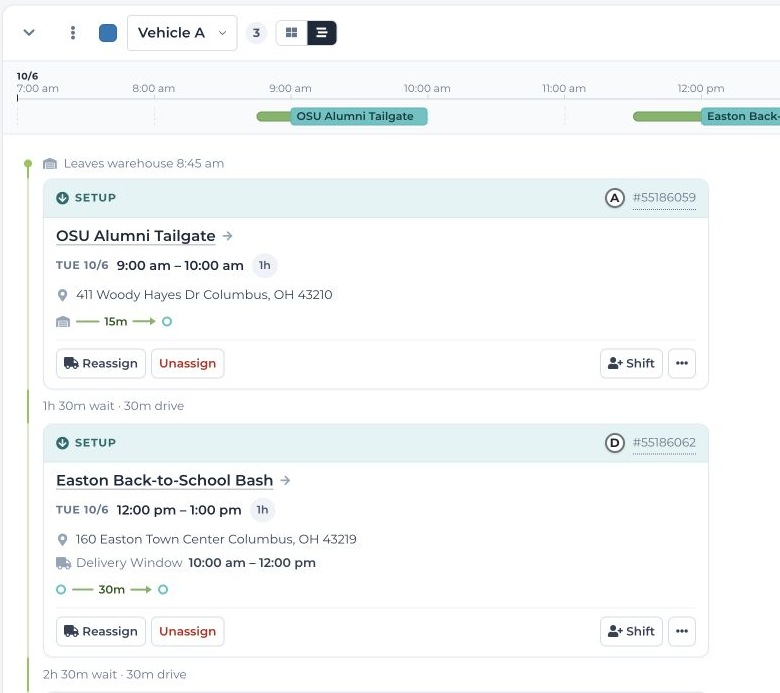
Review a Vehicle in Route Sequence
- Open a scheduled vehicle group.
- Select Sequence in the Cards / Sequence toggle.
- Review the departure from the warehouse, stops, wait times, drive times, and return time.
The planner remembers this choice for each vehicle and location. Sequence is a reading layout; use the scheduling panel or day strip to change times.
Sequence view showing wait and drive times between stops.
Cards also show compact travel lines. Hover, focus, or tap a drive duration to see departure and arrival times.
Edit Operation Details
- Click the card title or open its menu.
- Select Details.
- Review the booking information.
- Update the schedule or notes as needed.
- Select Save in the dialog to apply the draft to the working planner.
- Select the main planner Save button to persist all schedule changes.
Closing the dialog, pressing Escape, or selecting Cancel discards its pending draft.
Add Route Work
Duplicate Work to Another Vehicle
- Open a Setup, Event, or Tear Down menu.
- Select Duplicate to Vehicle.
- Select another eligible vehicle.
- Set the copy’s start time and duration.
- Select Duplicate.
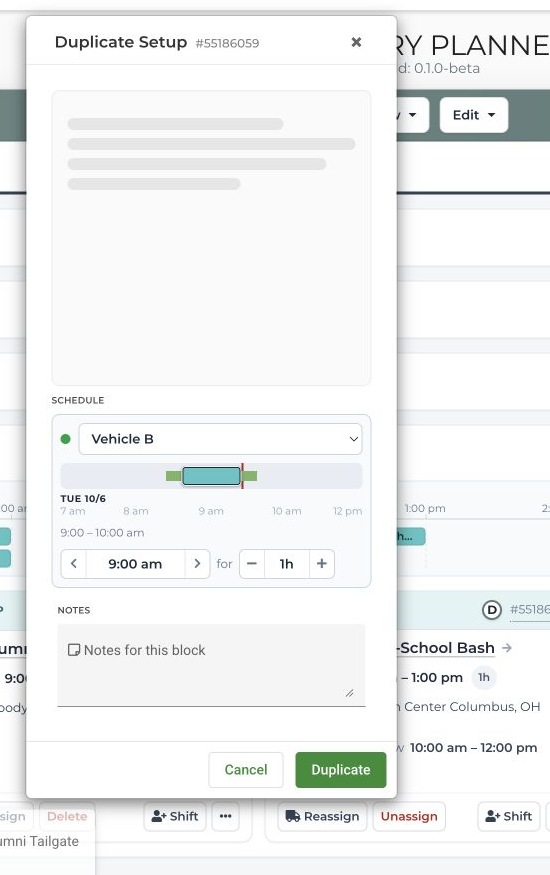
The source vehicle is excluded. The duplicate can use different setup or tear-down times, but booked event times remain fixed. Canceling leaves no copy behind.
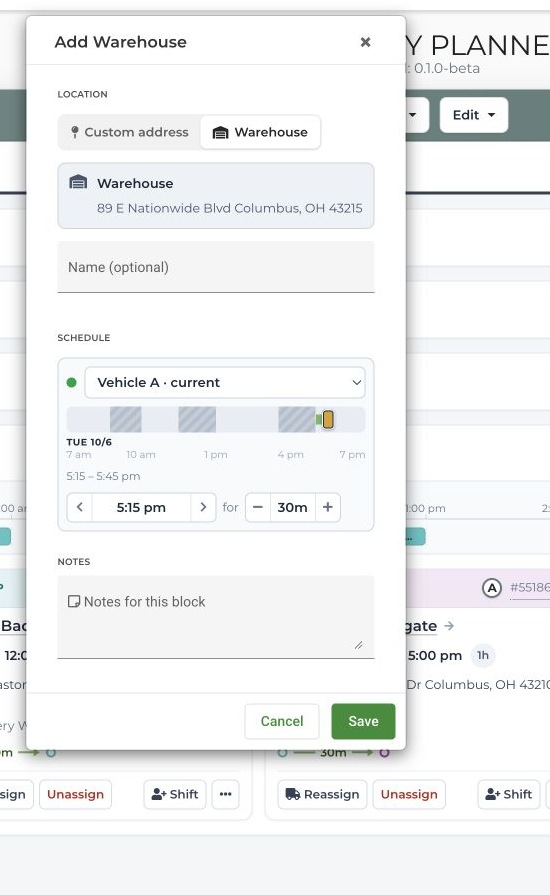
Add a Warehouse Stop
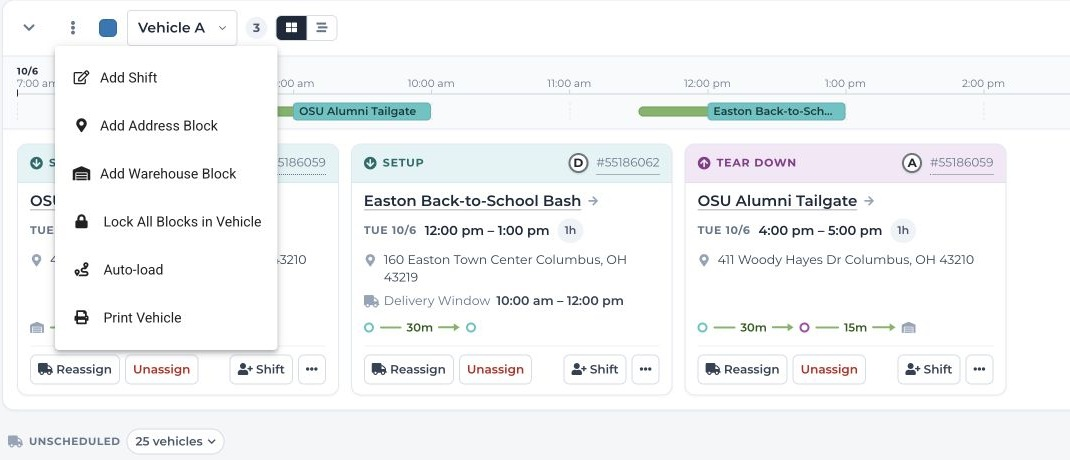
- Open the vehicle’s Resource actions menu.
- Select Add Warehouse Block.
- Enter an optional stop name, such as Load vehicle or Unload vehicle.
- Select the vehicle, start time, and duration.
- Add notes if needed.
- Select Save.
Create a warehouse stop using the location warehouse address.
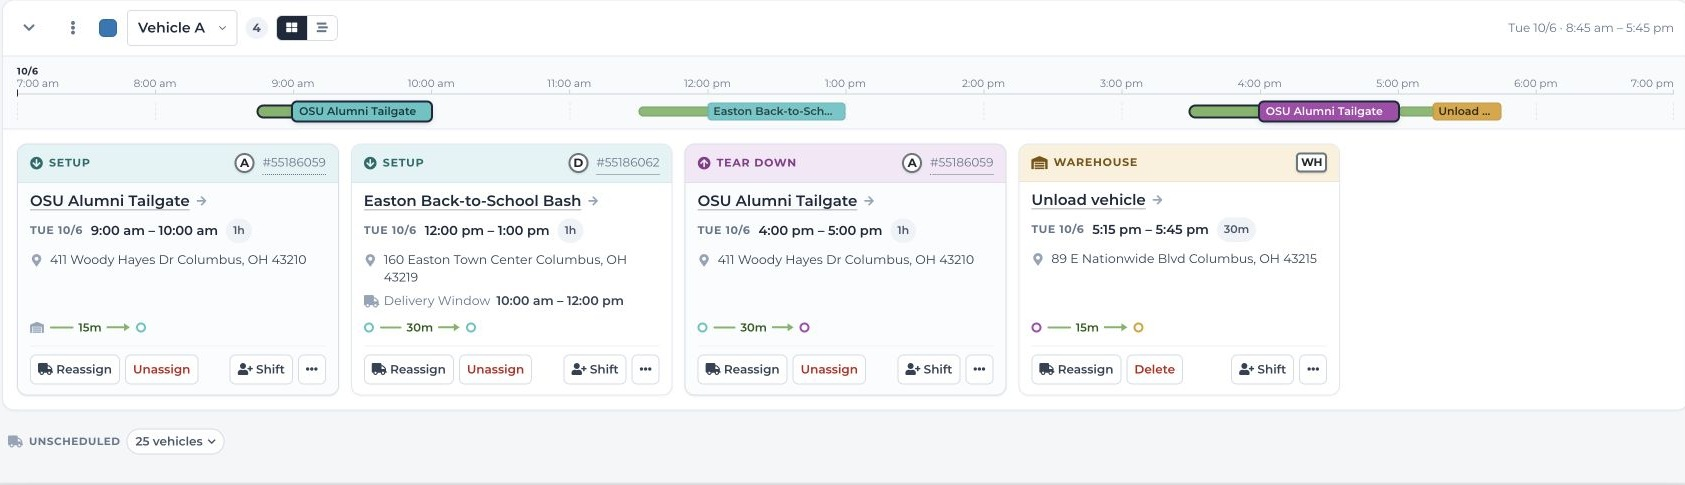
A warehouse block is scheduled work with its own duration and travel. It appears as an amber Warehouse card with a WH badge and is retained after the planner is saved and reloaded.
Add a Custom Address Stop
- Open the vehicle’s Resource actions menu.
- Select Add Address Block.
- Enter or select the address.
- Wait for the location to resolve.
- Set the vehicle, start time, and duration.
- Select Save.
Use the Custom Address and Warehouse selector to change the stop type. The Warehouse option is available when the selected location has coordinates.
Add a Worker Shift
- Select Add Shift from a vehicle menu, or select Shift on an operation card.
- Choose the worker and position.
- Select a saved Meet At Location.
- Set the vehicle, start time, and duration.
- Save the shift.
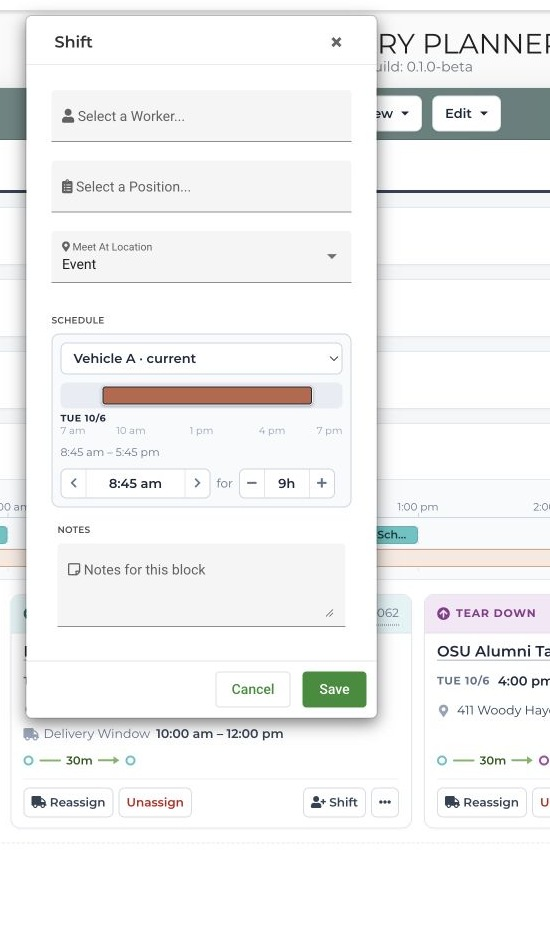
A linked shift moves with its linked operations. Shift cards and the lower day-strip track help compare staffing coverage with the vehicle route.
Keep the Map Visible
- Open View.
- Select Pin Map.
- Scroll through the planner. When the normal map leaves the screen, it floats in the lower-right corner.
- Resize the floating map with its corner grip.
- Use arrow keys for smaller size adjustments.
- Double-click the grip to reset its size.
- Close the floating map to unpin it.
- Click a card’s location badge to reveal and highlight its stop.
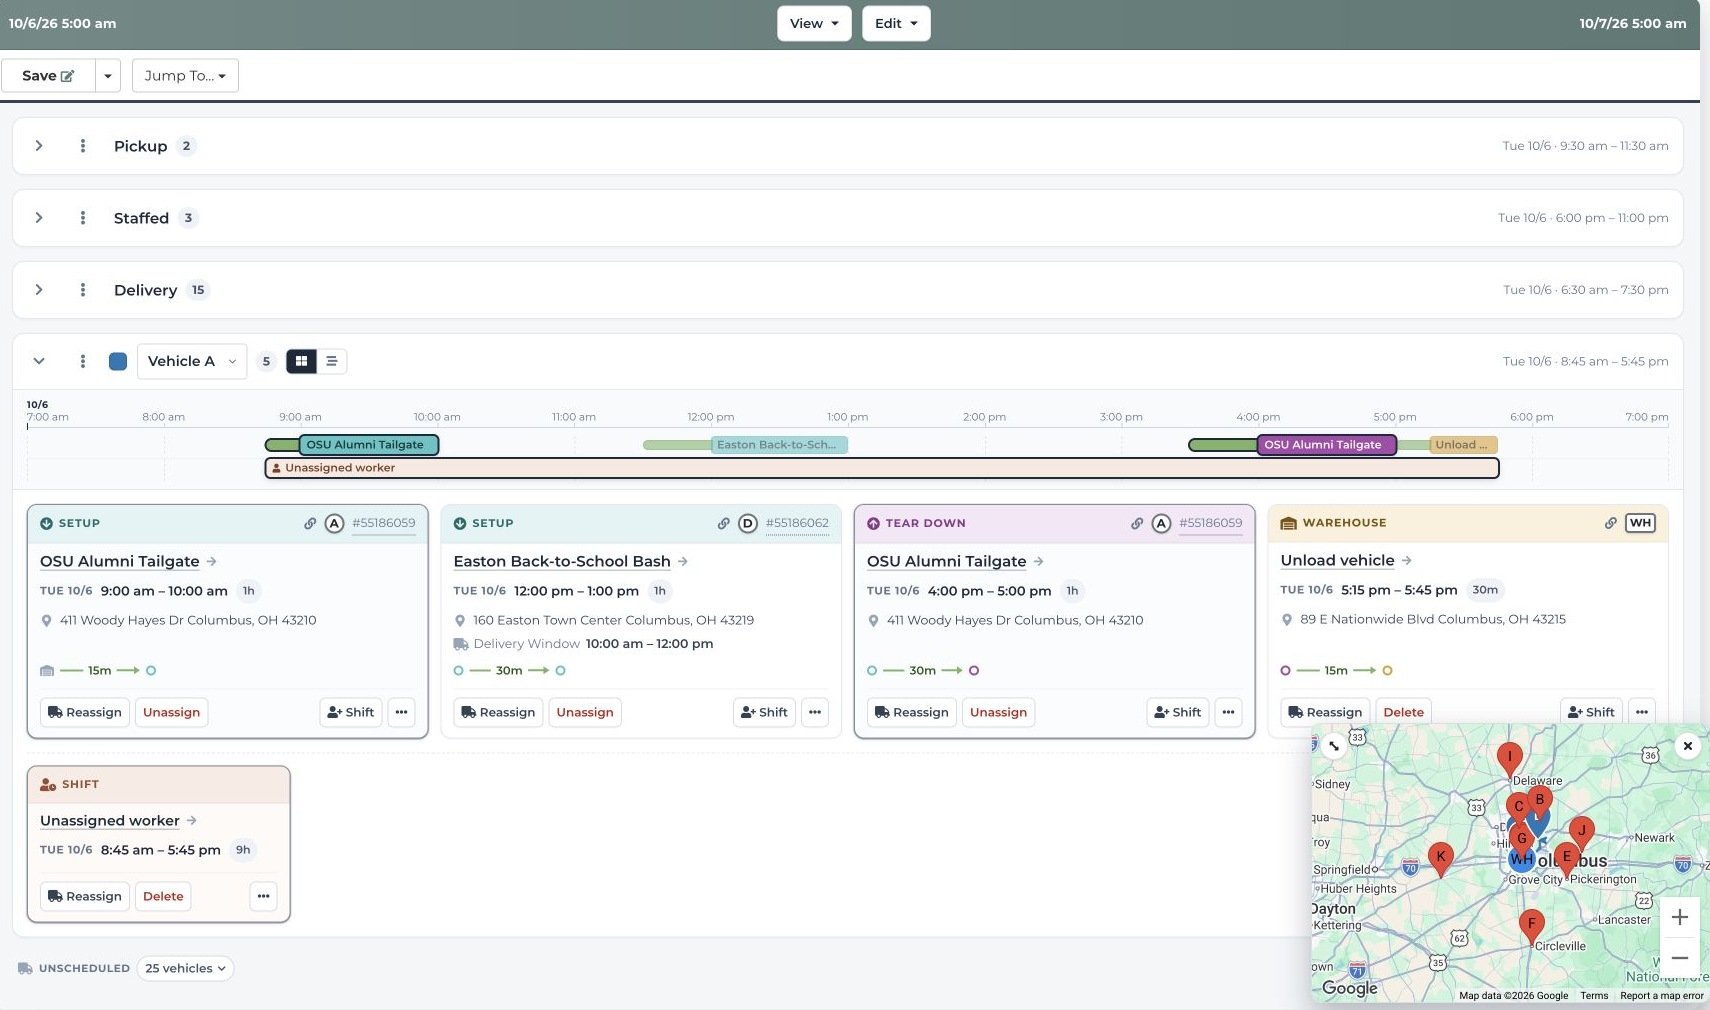
Map pins use the assigned vehicle’s route color. Vehicle color swatches can filter the displayed routes.
Use Auto-Load
Run Auto-load from the Save dropdown for the entire planner or from a vehicle’s Resource actions menu.
- The routing service selects vehicles and visit order.
- The planner applies travel times, booking limits, warehouse travel rules, and multi-day restrictions.
- Events and locked blocks remain fixed.
- Work that cannot fit remains unassigned and is listed in a notice.
- If required travel cannot be calculated, Auto-load stops before applying the plan.
- The completed plan is added as one Undo step.
Feature Options & Parameters
| Option | Effect |
|---|---|
| Card / Timeline | Changes the planner layout without changing the working schedule. |
| Cards / Sequence | Shows vehicle operations as standard cards or in drive order with wait and travel details. |
| Link Blocks | Moves eligible companion operations together. |
| Assign / Reassign | Selects a vehicle and adjusts the operation’s schedule in one action. |
| Unassign | Returns eligible work to its original unassigned group. |
| Duplicate to Vehicle | Creates a scheduled copy on another eligible vehicle. |
| Pin Map | Keeps a resizable floating map visible while scrolling on desktop. |
| Jump To | Moves directly to a visible unassigned or vehicle group. |
| Today | Loads today as a single planner day using the configured planner start hour. |
| Undo / Redo / Undo All | Reverses working planner actions. Undo All returns to the schedule loaded at the start of the session. |
Use Cases
- Dispatch scheduling: Review unassigned operations, assign each one to an available vehicle, resolve timing conflicts, and save the completed schedule.
- Route preparation: Use Sequence View to verify drive order, add warehouse loading or unloading stops, and compare worker shifts with vehicle activity.
Troubleshooting & FAQs
Q: Why is Card missing from the View menu?
A: Card View is currently limited to administrators and selected rollout accounts. Accounts outside the rollout continue to use Timeline.
Q: Why can’t I switch to Timeline on my phone?
A: On enabled accounts at widths of 640 pixels or less, Card View is used automatically and the Timeline option is hidden.
Q: Why is Apply disabled?
A: Review the warning in the scheduling panel. The operation may overlap another stop, violate an event time or locked window, or be linked to work that cannot move. Locked blocks must be unlocked from their menu before editing.
Q: What does “Calculating travel” mean?
A: The planner is waiting for a travel-time result before it can fully evaluate the draft.
Q: What does “Travel unavailable” mean?
A: The planner could not obtain a drive time. This is a warning rather than a confirmed scheduling conflict, so placement may still be allowed. Review the route manually.
Q: Why can’t I change an Event card’s booked time?
A: The booked event time is fixed in the Delivery Planner. Update the event itself if its booked time must change.
Q: Why did changes disappear after I reloaded?
A: Saving inside a Details or scheduling dialog only updates the working planner. Select the main planner Save button to persist the schedule.
Q: Why were worker shifts removed when I unassigned a delivery?
A: Worker shifts that followed that delivery may be removed with it. The planner displays a notice, and Undo restores the delivery and shifts.
Q: Why can’t I add a Warehouse block?
A: Confirm that the selected location has a warehouse address and coordinates. Warehouse is unavailable as a stop type until its location can be mapped.
Q: Why does an operation show “Beyond range”?
A: Part of the existing operation extends outside the loaded planner dates. Load a wider date range to review its complete duration.
Q: Why did Auto-load leave work unassigned?
A: The work could not fit within the available vehicles, travel requirements, booking limits, or locked schedule. Review the Auto-load notice and assign the remaining operations manually.
Q: Why did Auto-load stop without applying a route?
A: Required travel may have been unavailable, or the working schedule may have changed while Auto-load was running. Resolve the travel issue or rerun Auto-load using the current schedule.
Q: Does switching between Card and Timeline discard unsaved changes?
A: No. Both views use the same working schedule. Changes are discarded only if you leave or reload without completing the main planner Save.