
Vendor Purchase Orders (PO's) are managed as live documents per vendor and lead, so you avoid duplicate drafts and always send the most up‑to‑date version to your vendors.
Prerequisites
- Your vendors are set up and linked to rental items as needed. For help creating vendors, see this article.
- At least one PO template is configured in your Document Center -> PO Templates (your account is usually set up with a default vendor PO template that can be modified at any time, except for previously signed PO's).
Step‑by‑Step: Creating and Emailing a Vendor PO
- Open the lead that needs a vendor PO.
Go to Events -> Leads/Events, find the lead, and open it.
You can also filter vendor items on the Leads/Events page (Preset: Contains Vendor Items).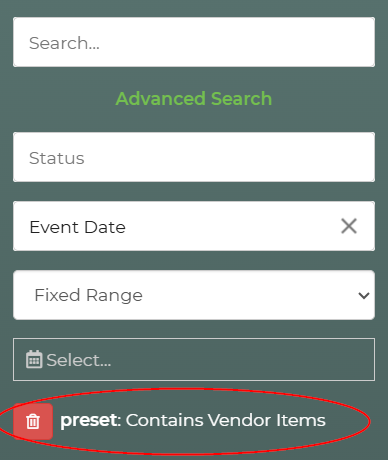
-
Confirm vendor items on the lead.
Make sure rental items that require a vendor PO:- Are on the lead, and
- Have a vendor item selected.

-
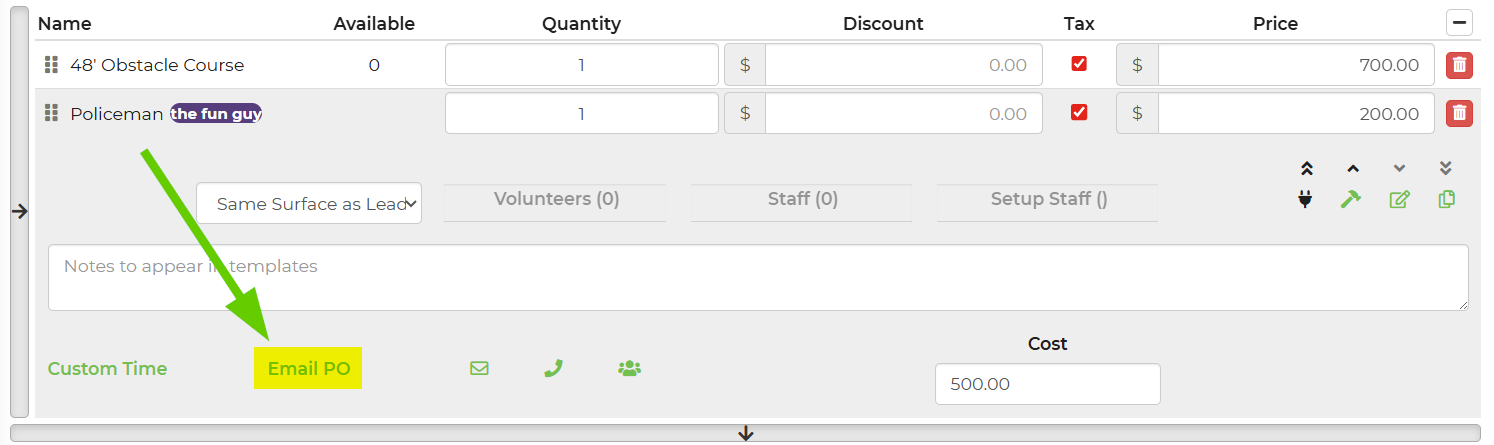
Locate the PO section on the lead (left hand side).
- Choose the vendor row you want to create a PO for.
- Click the Email PO (or similarly labeled) button for that vendor. The system will:
- Create a live, unsigned PO for that vendor if one doesn’t exist yet, and
- Open the email panel so you can send the PO to the vendor.
-
Review the PO content.
From the PO list for that vendor:- Use the View link to preview the PO.
- Confirm the items, quantities, dates, and prices match the current lead. While unsigned, the PO will always reflect current lead information when you view it.
-
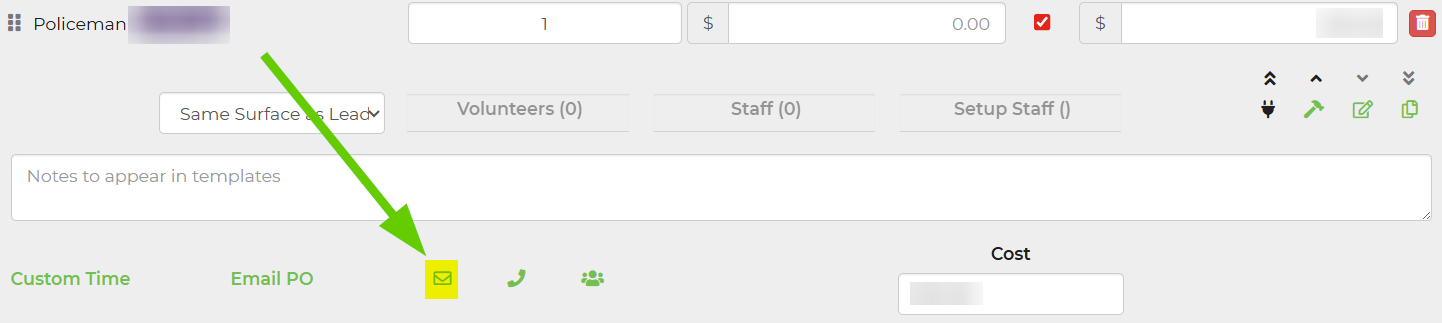
Email the PO to the vendor.
In the email panel:- Verify the vendor’s email address.
- Optionally adjust the subject or message body.
- Send the email; the PO link in the email points to this live unsigned PO.
- To review and change the cost of a vendor item, please see this article.
Updating a PO After Editing the Lead
If you change items, dates, or prices after you have already generated a PO but it is still unsigned, you do not need to create a new PO - these changes will reflect on any unsigned PO's.
What Happens When a Vendor Signs a PO
- When the vendor signs the PO from their link:
- The PO is marked as signed and its content is frozen as of that moment.
- A signed PO entry is stored and shown in the list for that vendor.
- After signing:
- The signed PO becomes a historical document (snapshot in time, the status will say "Signed").

- The PO’s contents will not change if you later edit the lead.
- Signing controls will no longer be shown to the vendor on that signed document.
- The signed PO becomes a historical document (snapshot in time, the status will say "Signed").
Generating a New PO After One Is Signed
- Go back to the lead’s PO section.
You will see the older signed PO listed for that vendor.
- Create a new PO if needed.

If you need a new PO (for example, major changes after signing):
- Use the provided Generate/Email PO option again for that vendor by Archiving the signed PO.
- The system will create a new unsigned live PO based on the current lead.
- Older signed PO's remain available.
Previous signed PO's stay in the list so you can:
- View,
- Download, or
- Reference them later.
Archiving the PO keeps the current PO as a history and reverts the PO back to live so the vendor can sign the new, updated PO.
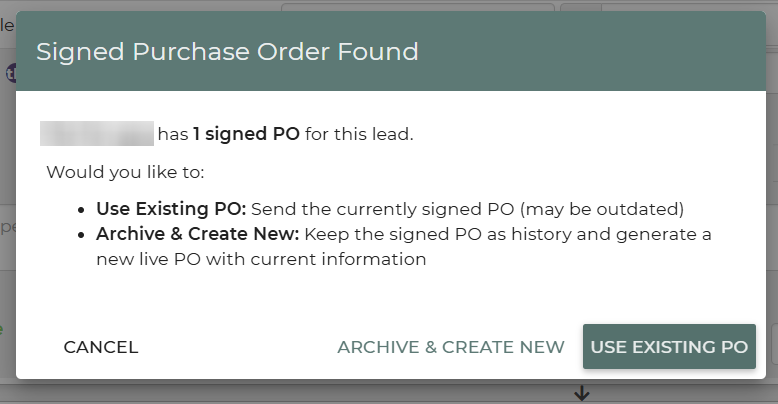
When attempting to send a new PO to the vendor, you may get this alert. This is giving you the option to use the existing PO or archive and create a new PO.
Feature Options & Behavior
- Live vs Signed PO
- Live (unsigned) PO: Always reflects current lead data each time it is viewed or emailed.
- Signed PO: A snapshot that never changes; used as your record of what the vendor agreed to.
- Per‑Vendor Limit
- The system maintains one active unsigned PO per vendor per lead.
- Clicking Email PO again reuses that live PO instead of creating duplicates.
- Template choice
- Your account uses a default PO template for vendors.
- If multiple PO templates exist, you may see a way to choose which template to use for that vendor’s PO.
- Template design changes should be made in your Document Center, under the PO Templates (not by editing a signed PO).
Use Cases
- Stop accidental duplicate PO's to the same vendor
Staff can click Email PO multiple times (for updates or resends) without generating multiple draft PO's. Vendors always see a single, current PO until it is signed.
- Quickly update a vendor when event details change
Change quantities or dates on the lead, then reopen/email the same live PO. The vendor sees the updated information without you having to manually rebuild the PO.
Troubleshooting & FAQs
Q: I clicked Email PO several times and only see one unsigned PO. Is that correct?
A: Yes. The system keeps one live unsigned PO per vendor per lead. Re‑using the same PO avoids duplicates and ensures the vendor always sees the latest version until it is signed.
Q: The PO my vendor sees does not match what I see on the lead.
A:
- First, confirm whether the vendor is viewing a signed PO (which is frozen) or an unsigned live PO.
- If the PO is signed, it will not update when you change the lead. Create and send a new PO if you need the vendor to agree to new terms.
- If the PO is unsigned but appears outdated, refresh the lead and click View or Email PO again. The content should refresh from the current lead data.
Q: I want to send a general email to the vendor without a PO. Where did the other email button go?
A: The vendor PO area has been simplified to focus on PO emails. To send a non‑PO email, use the regular email options from the lead or from the vendor/contact record instead of the PO‑specific button.
Q: Can I edit the text of a signed PO?
A: No. Signed PO's act as historical records and are not edited. If you need a different version, create a new PO from the lead using the latest data and send that to the vendor.
Q: My PO template needs different wording for all vendors.
A: Edit the PO template in your Document Center settings (not on the individual signed PO). Changes apply to new or unsigned PO's that use that template; existing signed PO's remain unchanged.